Deviation Actions

Well, here's a bit of a help. Auto-fit clones.
They've been around a while, and since Genesis they have allowed different generations of clothing to fit to different models. There are several out on the market that can be bought right now that allow for a lot of versatility especially in the G2, and G3 models, and slowly G8 seems to be catching up. However, one thing that hasn't happened yet on DAZ's or the content creators part was bringing out an auto-fit clone so that G2 or G3 could easily fit the new clothing that was coming out for G8. I can only think it's intentional on DAZ's part to block something like this from coming out in order to boost sales of their new models, and make it harder for clothing to fit on the "older" models. (If a couple years can really be considered old given that V4 reigned for almost 10.) Nevertheless, I'm bringing it to you so that you can use all the neat new stuff on your G3, and perhaps this technique can even be used to help bridge the gap between G8 and the other series of models that people use.
Okay, so let's get started.
**EDIT: I have become aware of an issue that affects SOME DAZ users to where when they zero their models they are not returning to Base resolution. (1/1) That being the case in steps 2 and 14 you need to be aware that this can be an issue, and make sure that you check the resolutions and make sure they are the same throughout the process or you will receive an error at step 15 when you are trying to load the morph.
Step 1: Load G3F

Step 2: Zero your G3F figure. There's two ways to do this: Right click the Parameters Tab, mouse to Zero, and click Zero Figure, OR use the Edit menu Figure to Zero, to Zero Figure, and click on that.

Step 3: Use the File menu and Export. Name it Genesis 8 Clone. Save and Accept.


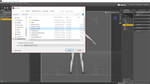
Step 4: Use the File menu and Import. Choose the Genesis 8 Clone that you just created. It should look like this.

Step 5: Using the Edit menu, under Figure select Transfer Utility. In the drop-down menus, have G3F in Source, and Genesis 8 Clone in Target. Then Accept.


Step 6: Select Genesis 8 Clone. Change Parent to none by going to the Edit menu, Object, Change Parent and clicking on that. A menu will appear that you scroll to the bottom of, select "none" and click Accept.


Step 7: Select G3F then delete it. (Edit menu, delete, delete selected items)

Step 8: Load G8F Developer load. (Use this or the eyelash figure will mess things up apparently.


Step 9: Fit the Genesis 8 Clone to the G8F. To do this select the Genesis 8 Clone, go to the Edit menu, Figure, Fit to and click it. A box will pop up and you select Genesis 8 Female and click Accept. Another box will pop up (this one an auto-fit) and you select Genesis 3 Female as the figure that it was originally for, and Full-Body as the type of item.


Step 10: Hide G8F. Only the Genesis 8 Clone should be visible.

Step 11: Use the File menu and Export. Name it Genesis 8 Female. Save and Accept as before.

Step12: Clear the scene.

Step 13: Load G3F again.
Step 14: Zero your G3F figure. There's two ways to do this: Right click the Parameters Tab, mouse to Zero, and click Zero Figure, OR use the Edit menu Figure to Zero, to Zero Figure, and click on that. (Yes, again.
Step 15: Open Morph Loader Pro. To do this, use the Edit menu, Figure, and select Morph Loader Pro. A box will pop up that will allow you to select how you want to load your morph. Click on the Choose Morph Files button and choose your created Genesis 8 Female object. Then click Accept, and it should load the morph into the G3F.


Step 16: Select G3F if not already selected, and find the new morph in the Parameters tab under the character. (It will start out under the Morphs section.) Click on the gear next to it and enter into the settings in order to change a few things. First, click the drop-down next to Path and change it to Hidden/Clones. Second, click the drop-down next to Type and change it to Modifier/Clone. Third, check the Hidden box.

Step 17: Use the File menu to Save As a Morph Asset. A box will pop up. Click on the arrow next to Genesis 3 Female, find the box next to Hidden and check it. Click Accept.


Step 18: You now have an auto-fit clone for Genesis 8 Female. When you load a G8 outfit to G3, the What Figure drop down in the auto-fit dialog will have Genesis 8 Female as an option. Woohoo!
Okay! So isn't that great!

Of course, with anything there are a few provisos, a few quid pro quo's...
Quote from Singular Blues' post:
Limitations
G3 and G8 have very different shoulders, despite all the vertexes in the shoulders being the same. This may cause clothing to look a bit odd in this area. This limit will apply to any other method, but results may vary.
Custom bones will be lost. SickleYield has a tut on her DA for preserving custom bones for Generation 4 or less figures while fitting to Genesis+. This method will work G8 to G3. In fact, it will work better than it does with Gen 4. This is because the method preserves all the bones, and this can cause posing problems with figures that don't share the same skeleton. G8 and G3 do share a skeleton (3 has a few bones 8 doesn't but they don't matter here) so the SY tut should result in fairly exact transfers (which may lead to different behavior at the shoulders, so this might be worth a try if plain autofit gives a bad shoulder result). Note: Somewhere in the tut you are instructed to convert figure to weight mapping. This is not reqired for transfers between Genesis figrures. It's a Gen 4 or less thing.
For all the ways 3 and 8 are alike, they are not the same figure, and autofit is mostly an authoring tool. It can do a good job (or a great job) transferring between figures, but the intended role was for the author to make adjustments after autofit, so results will be variable.
Righty Oh then! And I believe that tutorial that is being talked about is here:
So thanks for that
 !!!
!!! I hope this has been helpful, and gotten the word out to folks here in the community so it doesn't get buried in DAZ's forums.
Lots of
~LQ
**EDIT: I have become aware of an issue that affects SOME DAZ users to where when they zero their models they are not returning to Base resolution. (1/1) That being the case in steps 2 and 14 you need to be aware that this can be an issue, and make sure that you check the resolutions and make sure they are the same throughout the process or you will receive an error at step 15 when you are trying to load the morph.
Lady Quantum: Origins
What If? LQ Were Kryptonian?
The Country Roads Thanksgiving Weekend Sale
Lady Quantum's Halloween Bash 2019!

This is AMAZING!
This issue has been bothering me for ages! You won't believe how much lifes you have saved me!
Thank you VERY much for your great help!
But, in current version (4.20), you "have to" change your model resolution to "Base" before your first export, otherwise the geometry just won't fit when you load it with Morph Loader Pro, and you could use regular G8 figure at Step 8 instead of Developer Load, everything else pretty much worked the same.
Thanks again for your great help.